
Pool Deck Elevation Beside an Existing Lanai
Pool deck elevation should be planned around your existing lanai, door thresholds, pool edge, and drainage routes before construction begins. The goal is a comfortable connection that moves water away from the house without creating unexpected steps or low spots.
A deck that looks level on a drawing can meet the lanai at the wrong height once coping and paving are installed. Starting with finished surfaces , rather than the bare concrete beneath them, helps you avoid that problem.
Measure the Existing Lanai and Yard
The existing lanai gives your pool designer a starting point, but its surface may slope or vary in height. Measurements across the whole space are more useful than a single reading at the door.
Establish a Reference Point
A pool builder or survey professional can use a laser level or survey equipment to establish a stable reference point, often called a benchmark. Every important height can then be recorded in relation to that same point.
The measurements should include the finished lanai surface, house door thresholds, screen door openings, and the edge where the new deck will meet the lanai. Readings at both ends of the connection show whether the existing surface changes height along its length.
The team should also record nearby ground levels, existing drains, downspout outlets, and the areas where the pool and deck are proposed. These readings reveal how much room there is for drainage and how the new work may meet the yard.
Look Beyond the Lanai Edge
A lanai can appear flat while directing water toward a lawn or an existing drain. Recording that slope helps the designer avoid interrupting a working drainage path.
The surrounding yard matters, too. Fences, neighboring lots, landscaping, and a screen enclosure can limit where water can leave the deck. Include those features when planning pool deck size and layout, since the space available affects both circulation and grading.
Set the Finished Pool Deck Elevation
The finished deck elevation is the height you see and walk on after the surface material is installed. It needs to work at several points at once: the lanai, the house, the pool coping, and the outside edge of the deck.
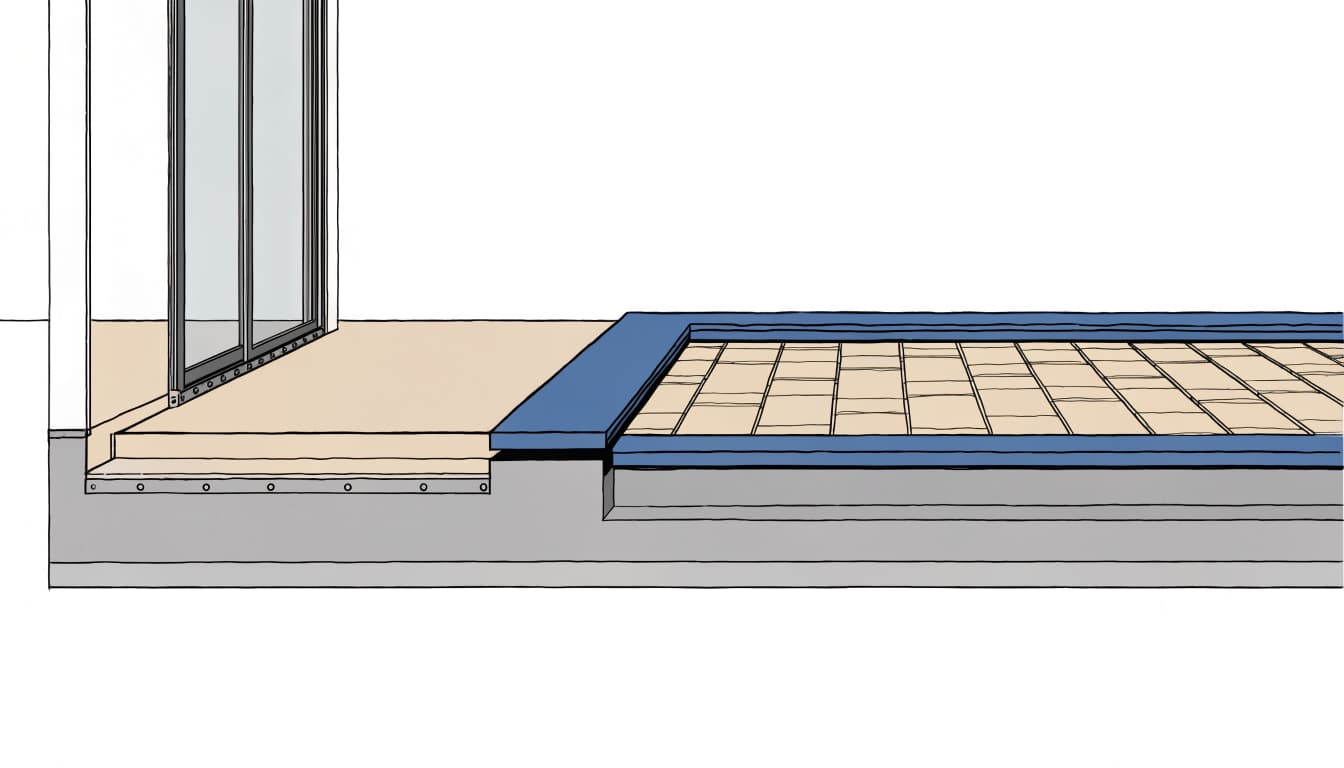
Coordinate the House and Pool Heights
Start with the existing finished lanai and door thresholds, then establish a proposed height for the new deck where the two surfaces meet. From there, the design can show how the deck slopes toward its drainage route and connects to the pool edge.
The pool shell and coping must be planned with that finished height in mind. If the shell is positioned before the deck and coping details are settled, the finished edge may sit higher or lower than intended.
A drawing should show the relationship between the lanai surface, finished deck, coping top, and waterline tile. It should also identify any intentional change in height rather than leaving the transition for the paving crew to solve.
Account for the Full Surface Assembly
Pavers and stone have thickness, and their installation may include bedding and a prepared base. A concrete deck with a surface finish has a different assembly. The planned height must account for the entire system, not just the visible top layer.
For example, adding pavers over an existing surface can raise the walking surface near a door or screen track. That may change the available clearance or create a lip at the edge. Include the existing and proposed assemblies in the plan before choosing a flush transition.
Choose the Transition, Steps, or Ramp
The route between the lanai and pool should feel natural underfoot and remain clear when furniture is in place. A flush connection may work, but only when the available heights and drainage plan support it.
When a Flush Connection Works
A continuous surface can make it easier to move chairs, pool equipment, and mobility aids between spaces. Even then, the deck still needs a planned slope and may need a joint or drain at the connection.
Pay attention to sliding-door tracks, screen doors, and any exterior doors that swing over the walking surface. The new finish must leave the openings usable and avoid covering parts that need to drain or operate.
A flush-looking deck also shouldn't hide a small, abrupt lip. That detail can catch a foot or wheel, especially when people are moving between sun and shade.
Place Height Changes Where People Can See Them
If the heights can't meet comfortably, an intentional step or ramp can create a clearer transition. Place a step away from door openings and busy turns, with enough usable space on each side. Good lighting and a visible edge help people recognize the change in level.
A ramp needs a continuous, comfortable route, appropriate surface traction, and space at each end. Its slope and layout depend on the users and the project requirements, so discuss mobility needs before the pool footprint is finalized.
Our guide to pool deck safety and clear pathways offers more ideas for keeping the route usable as your needs change.
Plan Drainage Away From the Home
Rain, pool splash-out, and hose water all reach the deck. In Southwest Florida, a design also needs to handle heavy rain without sending runoff against the house or carrying debris into the pool.
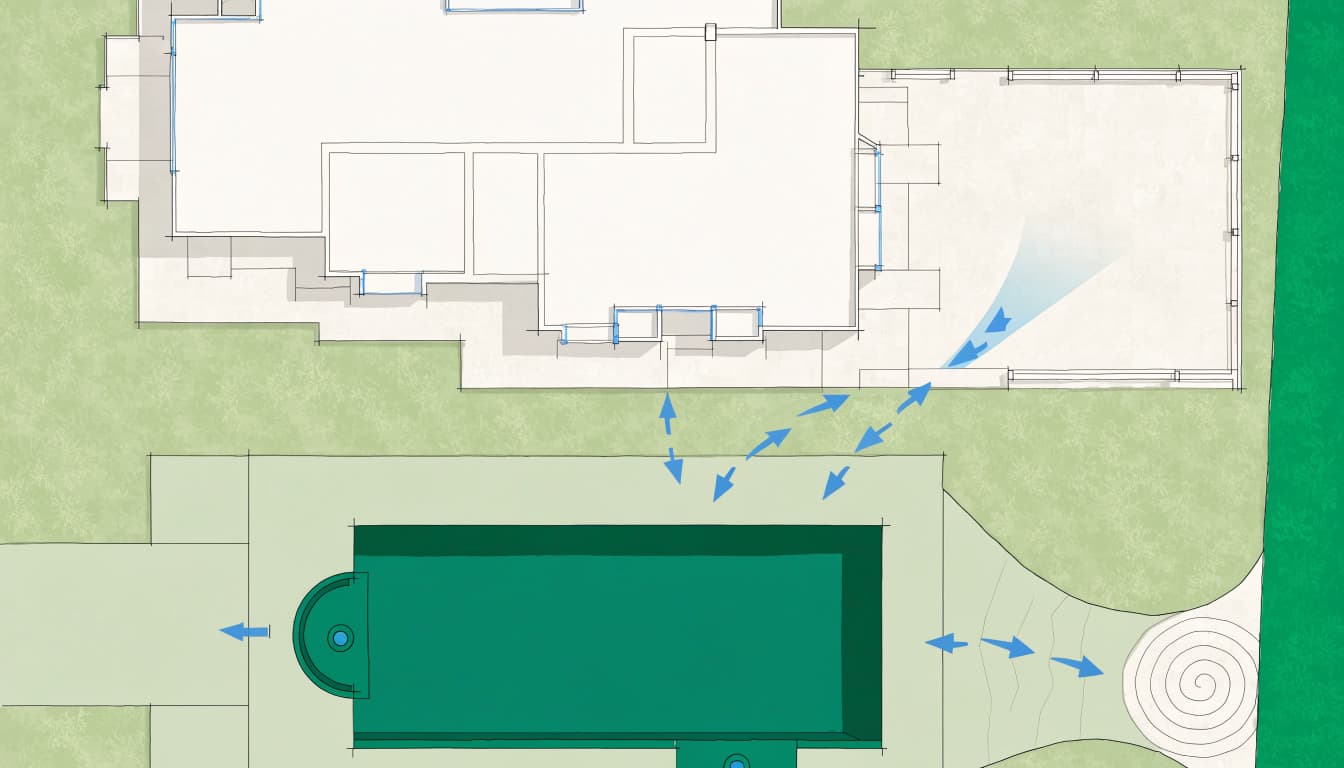
Follow the Water Across the Whole Site
The deck should direct water away from the home and, where site conditions allow, away from the pool. Its surface may slope toward a lawn, swale, or collection point, depending on the available elevations.
Trace the path beyond the deck edge. Water that leaves the paving still needs somewhere suitable to go without pooling beside the foundation, washing out landscaping, or affecting a neighboring lot.
Existing downspouts and enclosure drainage belong in the same plan. A downspout that empties beside the proposed pool can add more water to an area the new deck already needs to drain.
Match Drains to the Available Space
A channel drain can collect water along a lanai or deck edge and connect to a pipe leading to an appropriate outlet. A catch basin can collect runoff at a planned low point. Some sites may use a combination of surface grading and other drainage systems.
The drain opening is only one part of the design. The pipe route, outlet, and access for cleaning all need space. Review the pool deck drainage options for Southwest Florida homes as part of the layout, before paving and planting block those routes.
Coordinate Coping, Paving, and Joints
Coping and paving may look like finishing choices, but their dimensions affect the height and construction of the entire transition. Select the materials early enough to include their actual assembly in the design.
Plan the Pool Edge as a Complete Detail
Coping sits at the top of the pool edge and connects visually to the surrounding deck. Its thickness affects the finished height, while its profile influences how the edge feels to swimmers sitting or entering the pool.
The coping, waterline tile, and deck should meet with consistent alignment. Raised walls or an attached spa add more junctions that need attention. The plan should show how those features connect instead of assuming the same detail works around every edge.
The gunite pool bond beam and coping details also matter because the pool structure and deck are separate systems. A planned movement joint commonly separates them, allowing the adjoining materials to move without relying on a rigid connection.
Choose a Surface That Fits the Height Plan
Concrete pavers and travertine can both work around a pool, but their installation details differ. Compare samples for wet traction and appearance, then account for their thickness and base requirements at the lanai and pool edge.
The joint pattern and layout matter near steps, drains, and screen enclosure posts. Small cuts or narrow strips can make those areas harder to finish neatly. Our comparison of pavers and travertine for pool decks covers material considerations that can influence your choice.
Resolve Site Conflicts Before Construction
A proposed pool deck elevation can affect parts of the backyard that aren't obvious on a pool drawing. Reviewing them together helps prevent changes after excavation or paving has started.
A screen enclosure, for example, has doors, posts, and footings that must work with the new surface. A higher deck can affect door clearance, while a lower deck can leave an awkward transition at the frame. Drainage should also avoid directing water toward enclosure components or trapping it along their base.
Utility lines and drainage pipes need routes beneath or around the deck. Electrical work, plumbing sleeves, and equipment access should be coordinated before the base and finish go in. If a drain crosses the deck, its location should fit the walking path and allow access for cleaning.
Pool barriers and gates also affect the layout. Keep required access and safety features in the project plan, along with applicable permits, inspections, and property restrictions.
Follow a Practical Planning Sequence
A clear sequence gives each decision a place before construction begins:
- Measure the existing conditions. Record the lanai surface, thresholds, yard elevations, drainage features, and proposed pool area against one reference point.
- Draw the pool and walking routes. Include doors, furniture, enclosure openings, and the space needed to move comfortably between the house and water.
- Set proposed finished heights. Show the connection to the lanai, the deck surface, coping, and any planned steps or ramp. Include the selected paving assembly.
- Map the drainage path. Show where water moves across the deck, where it enters any drains, and where it leaves the property through an appropriate outlet.
- Coordinate construction details. Resolve coping support, movement joints, utility routes, enclosure connections, and door clearance before the surfaces are built.
- Review the complete plan. Make sure the pool, deck, grading, safety features, and required approvals work together before excavation starts.
The plan should make the intended heights and transitions clear to everyone involved. If a material or layout changes, revisit the affected connections before construction continues.
Bring the Lanai and Pool Together
A successful pool deck starts with the existing home and ends with a clear path for people and water. Measuring the lanai, planning finished heights, and coordinating the pool edge early can prevent an awkward transition later.
At San Juan Custom Pools & Spas, we plan custom pools around the way homeowners use their outdoor space. If you're ready to discuss your backyard, we offer free estimates for pool and spa construction.