Gunite Pool Plumbing Basics for Southwest Florida
A beautiful pool can hide a complicated network of pipes beneath the deck and behind the equipment pad. For Southwest Florida homeowners, gunite pool plumbing deserves careful attention because repairs become difficult once the concrete shell and surrounding soil are in place.
The plumbing controls circulation, filtration, heating, sanitation, water features, and spa operation. A well-planned system runs efficiently and gives future service technicians a clear path for diagnosis. Because plumbing design, permitting, pressure testing, and drain safety affect the entire pool, qualified licensed professionals should handle the work.
Key Takeaways
- Gunite pool plumbing includes suction lines, return lines, drains, skimmers, equipment connections, and feature lines.
- Pipe sizing and equipment placement affect circulation, energy use, noise, and long-term maintenance.
- Southwest Florida groundwater, sandy soil, salt air, storms, and heat should influence the design.
- Plumbing must be pressure-tested before backfill and gunite application.
- Drain systems and electrical bonding require professional installation and inspection.
Gunite Pool Plumbing Basics: What the Pipes Do
A gunite pool uses a reinforced concrete shell formed around steel and plumbing. Before the gunite is applied, installers place the pipes that connect the pool interior to the equipment pad. Once the shell is finished and the deck is installed, much of this network is hidden.
The system has two primary sides. Suction plumbing moves water out of the pool, while return plumbing sends filtered and treated water back in.
Water usually leaves through skimmers, floor drains, or spa suction outlets. Skimmers collect surface debris such as leaves and insects. Floor drains help pull water through the lower part of the pool, although the exact circulation design depends on the pool shape and hydraulic plan.
On the return side, filtered water may enter through wall returns, spa jets, a tanning ledge, or water features. Each outlet needs appropriate flow and control. A large waterfall, for example, may require a dedicated line and valve instead of sharing a small return line with the main pool.
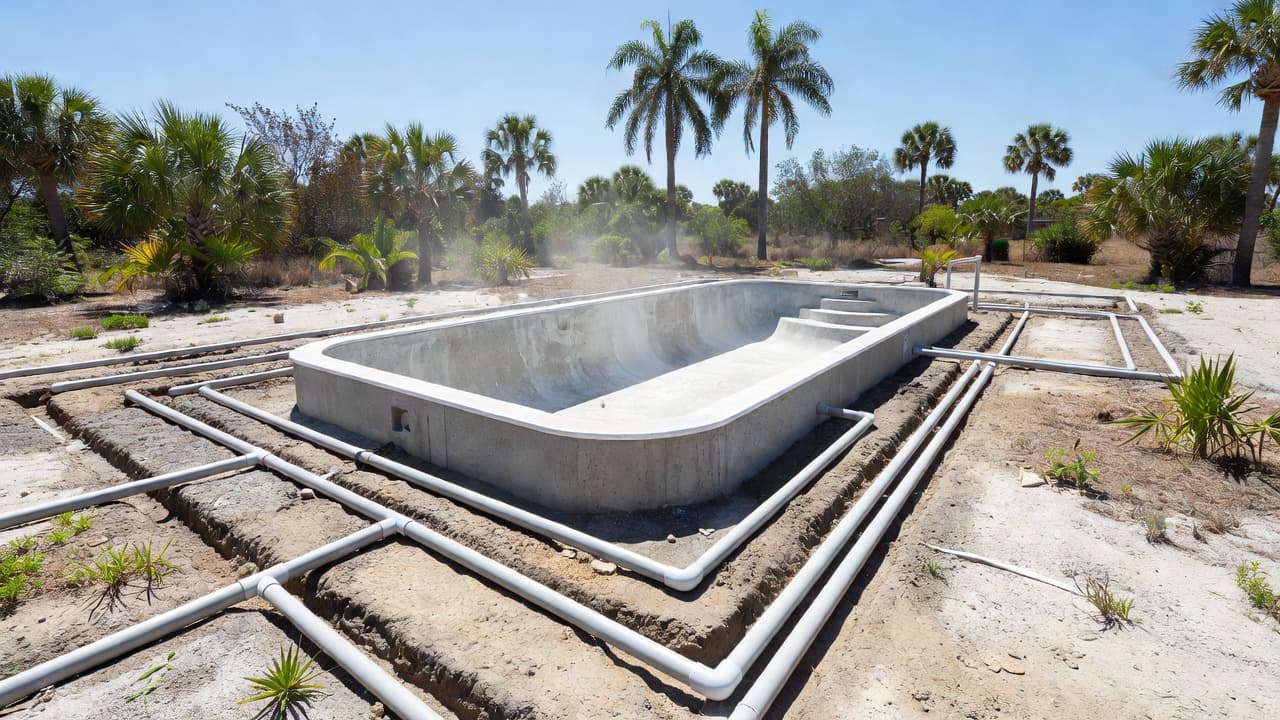
Most residential systems use pressure-rated PVC pipe and solvent-welded fittings. The installer plans the route to reduce unnecessary bends, protect the pipe during backfill, and provide access to valves and equipment. Pipe sizes should match the pump, filter, elevation changes, line length, and required flow.
A pool isn't better because it has more plumbing. It needs plumbing that matches its intended use. A compact plunge pool, a large family pool, and a pool with a separate spa all need different hydraulic planning.
Planning Suction and Return Lines
The pool layout should guide the plumbing plan before excavation begins. The builder needs to know the location of the skimmers, returns, drains, spa jets, cleaner line, heater, automation equipment, and water features.
Long pipe runs and sharp turns create resistance. That resistance makes the pump work harder and can reduce the flow available at distant returns or features. Good design keeps runs practical and uses sweeping turns where the layout allows.
Separate lines are often useful for equipment and features. A dedicated cleaner line can operate without disrupting the main circulation system. A spa may need its own suction and return plumbing so it can heat quickly and produce steady jet pressure. Waterfalls, bubblers, deck jets, and fountains also need attention during the design stage.
The equipment pad matters just as much as the pool shell. A shorter, cleaner route between the pool and equipment can reduce friction and simplify service. However, the pad also needs drainage, ventilation where applicable, clearance around equipment, and protection from standing water.
Southwest Florida properties can present difficult soil and groundwater conditions. Sandy soil may shift during excavation or backfill if the work isn't managed properly. A high water table can also affect excavation, shell construction, and underground plumbing. Your pool contractor should account for site drainage and groundwater conditions rather than treating every lot the same.
The plumbing plan should also coordinate with the deck, screen enclosure, irrigation system, electrical work, and landscaping. A pipe route that looks convenient during excavation may conflict with a future footing, paver edge, or drainage swale.
Where Plumbing Fits in the Construction Process
Pool plumbing isn't installed as a final connection after the shell is complete. It is part of the early construction sequence, when the ground is open and the shell layout is still accessible.
A typical project moves through design, engineering, permits, excavation, steel, plumbing, gunite, backfill, tile, decking, equipment installation, electrical work, interior finish, and startup. The exact order can vary by project and site conditions. San Juan Custom Pools & Spas outlines its pool construction process, including engineering and permits, excavation, gunite, plumbing and backfill, equipment, and final startup.
After excavation, the crew places the steel reinforcement and sets the pool fittings. Plumbing lines run through the excavation and connect to the skimmers, drains, returns, and specialty features. Installers support and protect those lines before concrete is applied.
The contractor should pressure-test the plumbing before backfill and before the gunite crew covers the fittings and shell. Testing helps identify leaks, damaged pipe, loose connections, or installation problems while the lines remain accessible.
A pressure test is useful only when the installer documents what was tested, how the system was isolated, and whether it held pressure according to the project requirements.
After testing, the crew backfills around the plumbing with appropriate care. Poor backfill practices can place stress on fittings or create voids beneath the future deck. The gunite crew then applies concrete around the steel and embedded plumbing fittings.
Homeowners should ask when testing occurs and how results are recorded. A reputable builder can explain the sequence without asking you to inspect or modify pressurized plumbing yourself.
Drain Safety Requires More Than a Single Outlet
Pool drains deserve special attention because suction can create a serious entrapment hazard when a person blocks an outlet. Modern pool designs use drain and suction systems that address this risk through approved covers, outlet placement, hydraulic design, and other safety measures.
A licensed pool professional should select the drain system for the pool's size and layout. The design should follow current safety standards, product instructions, engineering requirements, and applicable permit conditions.
Drain covers also have service lives. A cracked, loose, missing, or visibly damaged cover needs prompt professional attention. Homeowners shouldn't remove a drain cover or place a hand over an active suction outlet to test the system.
The same caution applies to skimmers and cleaner lines. Keep loose objects away from suction fittings, and teach children not to sit on or block pool outlets. If the pool has an older drain system, have a qualified professional evaluate it before remodeling or changing equipment.
Drain safety connects to the pump and valve layout. A professional needs to understand how suction is distributed during normal circulation, spa operation, cleaning, and maintenance. Changing a pump or rearranging valves without reviewing the hydraulic design can alter the way the system behaves.
Southwest Florida Conditions Affect Plumbing Choices
The local climate adds practical concerns to gunite pool plumbing. Southwest Florida receives intense sunlight, heavy rain, high humidity, and tropical weather. Saltwater pools add another consideration because salt and moisture can accelerate corrosion on nearby metal components.
The plumbing itself may use PVC, but the complete system includes pumps, heaters, filters, valves, fasteners, fittings, electrical equipment, and automation controls. Equipment should be selected and installed for the pool's sanitation method and exposure conditions.
Salt chlorine generators need proper water flow and correct placement in the return line. The cell should have enough access for inspection and cleaning. Metal components near the equipment pad should also receive appropriate protection, and electrical bonding must be handled by the qualified professionals responsible for that work.
Heavy rain can expose weak drainage around an equipment pad. Water should not collect around pumps, filters, heaters, or electrical connections. During design, discuss the pad's elevation, drainage path, and protection from runoff.
A storm can also damage exposed equipment or fill the pool with debris. That doesn't mean every system needs an elaborate enclosure, but the equipment location should allow safe access and reasonable protection. Your builder can recommend a setup that fits the property and local weather conditions.
Pool features create additional planning needs. A sun shelf may need bubblers. A raised spa needs plumbing that accounts for the change in elevation. A waterfall needs enough flow to create the intended effect without starving the main pool returns. Fire bowls use gas lines, so their installation must be coordinated with the appropriate licensed trade and the overall pool design.
Questions to Ask Before Construction Starts
Good plumbing decisions happen before the excavator arrives. During the design meeting, ask your builder for clear answers about the system and future service needs.
- Which outlets will use dedicated lines?
- Where will the equipment pad sit, and how will it drain?
- How will the design handle a separate spa, heater, cleaner, or water feature?
- What pipe sizes and equipment capacities match the pool plan?
- When will the plumbing be pressure-tested?
- Will the contractor provide a plumbing layout or equipment record after construction?
- How will drain covers, valves, and service connections remain accessible?
- Which licensed professionals will handle permits, electrical bonding, gas work, and inspections?
A plumbing diagram can help later if you add automation, replace a pump, or investigate low flow. Take photos before backfill and keep them with your project documents. The photos shouldn't replace contractor records, but they can show where lines run beneath the deck and yard.
Avoid selecting equipment based only on horsepower. A larger pump can increase energy use and may create excessive flow through plumbing or equipment that wasn't designed for it. The pump, filter, heater, chlorinator, valves, and pipe network should work as one system.
Finally, confirm who handles startup and water balancing. Initial operation helps identify air leaks, unusual pressure readings, valve problems, and flow issues before the project is fully closed out.
Conclusion
A reliable gunite pool starts below the surface. Proper pipe routing, balanced suction and return lines, safe drains, protected equipment, and documented pressure testing all matter before the concrete shell hides the work.
Southwest Florida homeowners should involve a licensed pool professional early, especially when the design includes a spa, heater, salt system, or water features. When the plumbing plan matches the site and the pool's intended use, the finished backyard is easier to operate, maintain, and enjoy for years.